Saturday, March 26, 2016

Bake With Me! Dark Chocolate Easter Cupcakes


Hey there everyone! Since it is Easter weekend, I decided to make some really cute and fun cupcakes and share the recipe with you guys. I  thought these would be really from for a family party, or even as a prize for an easter egg hunt, haha. I had such a blast making these, and I hope you guys do to!

Dark Chocolate Cupcake Ingredients:
1 1/8 Cups of all purpose Flour
1/4 Cup of unsweetened cocoa powder
 1 1/4 teaspoons of Baking Soda
1/4 teaspoon of salt
1 large egg
1/2 Cup of light brown sugar
1/2 Cup of granulated white sugar
1/2 cup and 2 tablespoons of whole milk
1/2 cup of unsalted butter melted

Directions:
1. Preheat the oven to 350 degrees F. Line 12 cupcake paper liners. 
2. To make the cupcakes, sift together the flour, cocoa, baking soda, and salt.
3. In a medium bowl, whisk together the egg, brown sugar, and white sugar. Whisk in the milk and melted butter. Whisk in the dry ingredients. Divide the batter evenly among the cupcake liners, filling them about three-quarters of the way full
4. Bake for 15 minutes, or until a tester inserted in the middle of the cupcakes comes out clean. Cool for 10 minutes. Using a small spatula or knife, remove the cupcakes from the pan. Continue to cool on a wire rack to room temperature.
5. To make the Buttercream frostingwhisk together 3 cups of confectioners (powdered) sugar and 2 sticks of unsalted butter in a large bowl. Once they are mixed together, scrape down the sides and add in 2 tablespoons or milk and 1 teaspoon of vanilla extract. I colored my frosting light green with food coloring to make it look like grass, but this is completely optional. 
6. Once the cupcakes are out of the oven and cooled and the frosting is made, pipe the frosting on the top of a cupcake, place a bunny peep in the middle of it, and two small cadbury eggs on each side.
Enjoy! Xoxo


Friday, March 18, 2016

DIY: Gallery Wall


One of the best parts of having a room/office is making it your own. I mean, who wants to sit at their computer all day with nothing fun to look at? Not me! By "fun," I mean decorations, paintings, bulletin boards, and pictures on the wall. 

A fun way to decorate your room or office is by making a gallery wall. A gallery wall is basically a set of small pictures or quotes of your choice in frames, and hung up on a wall. I have been working on the gallery wall in my room for quite a while now, and I love adding to it every now and then and watching it develop. 
If you want to start your own gallery wall, but are not sure how to do so, just keep on reading! 
Tip #1:
My first tip on creating your own gallery wall is sticking to a color scheme. Is it pinks and golds? or blues and yellows? By picking a color scheme, it will make every part of your gallery wall tie together even more.
Tip #2: 
Add some quotes. Don't get me wrong, pictures are great to look at but quotes will make your gallery wall all the more meaningful. So put them up! Some of the quotes I have on my gallery wall are "she believed she could so she did," and "Life's a party, dress like it."
Tip #3:
Put up some illustrated maps on your wall. I love traveling, so I put some maps of New York City, Paris and London (three of my favorite places) on my wall. I found mine on Pinterest, but I'm sure there are some great ones on google images too!

Tip #4: 
Make it your own! The best part about making a gallery wall is making it yours, so be creative, think outside the box, and make it resemble you and everything you love!

Details: 
I have found a lot of the components to my gallery wall on Pinterest, but I have also found a lot from various art markets I have been to in the past! On Pinterest, my favorite gallery wall artist is definitely Evelyn Henson.

Thursday, March 10, 2016

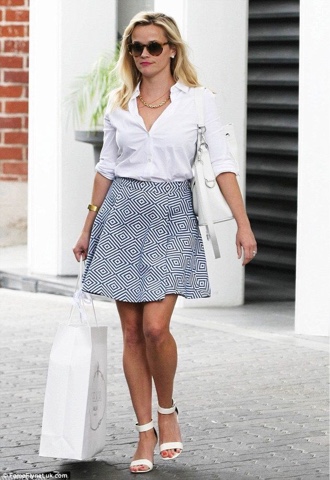
Style Icon of The Month: Reese Witherspoon

Hi, everyone! I'm so excited to announce that I am going to be starting a new series here on The Preppy Press. Every month, I am going to pick a style icon to feature on my blog, whether that'd be a celebrity, movie/tv character, or a fellow blogger. So, I thought the perfect way to start this series would be by featuring the lovely Reese Witherspoon. I just love her classy, elegant, girly, and chic style. I have also been admiring her new clothing brand, Draper James Girl. Even though I have not bought anything from her brand, that doesn't mean I can't look.

Here are some of my favorite outfits that Reese Witherspoon has styled.


Wednesday, March 2, 2016

How I Edit my Instagram Pictures

We all know it, we all love it. What am I talking about? Instagram, of course! One of the most fun forms of social media out today. It's great for pictures of food, decorations, flowers, and the occasional selfie of course. Another fun thing about Instagram is the "theme" you can develop. Some of the most common themes are the gray ones, faded ones, and the bright and colorful ones! 
I thought I would show you all how I like to edit my Instagram pictures and what my theme is like.
Enjoy:)

Some Instagram users use a certain filter on the majority of their photos, but I generally just use a couple different editing techniques. 


Let's take this coffee picture for example. 
The first thing I would usually do it up the brightness on the photo almost all the way. Then I would up the saturation a little bit, as well as the highlights. I usually do this process on after light or the Instagram app. Then, I would save it to my camera roll.


Next, I would take the picture onto face tune. I use face tune to make the backgrounds a little whiter and brighter.


 After this, I bring the photo back to Instagram, sharpen it a little more using the tool all the way to the right side, give it a fun little caption, and post it!
 I hope you guys liked this and I hope it was helpful!

Don't forget to follow me on Instagram: @elisemackenzie_